Amazing Sticky Honey Garlic Cauliflower in 5 Steps
A Warm Kitchen Welcome
Amazing Sticky Honey Garlic Cauliflower in 5 Steps — say that out loud and you can almost hear the skillet singing. This recipe is a little like a memory: bright honeyed steam, the whisper of garlic, cauliflower florets turning glossy and caramelized. Whether you’re after a homemade meal that feels like a family recipe or a quick dinner idea for a busy weeknight, this sticky, comforting dish wraps you in warmth. It’s an easy, festive treat that doubles as a healthy option and a crowd-pleasing indulgence.

Why You’ll Love This Recipe
- Big, bold flavor with minimal fuss — sweet honey, tangy soy, and savory garlic.
- Five simple steps: prep, coat, roast, sauce, and glaze — perfect for a quick dinner idea.
- Vegetarian and adaptable — a nourishing homemade meal that feels like comfort food.
- Budget-friendly and family-friendly — great as a weeknight main or a shareable appetizer.
- Works as a festive treat when you want something special without hours in the kitchen.
Ingredients
- 1 large head of cauliflower, cut into bite-sized florets — choose firm, white florets for the best roast.
- 3 tablespoons olive oil, divided — swap for avocado oil if you prefer a neutral flavor.
- 1/2 cup cornstarch — for a light, crisp coating; you can use rice flour for a gluten-free option.
- 1/2 teaspoon sea salt and 1/4 teaspoon black pepper — taste as you go.
- 3 tablespoons unsalted butter — for richness; use vegan butter for a dairy-free version.
- 4 garlic cloves, finely minced — increase to 6 if you love garlicky depth.
- 1/3 cup honey — maple syrup makes a lovely vegan swap and gives a slightly smokier note.
- 1/4 cup low-sodium soy sauce — tamari for gluten-free.
- 1 tablespoon rice vinegar or apple cider vinegar — brightens the glaze.
- 1/2 teaspoon chili flakes (optional) — for a gentle heat.
- 2 green onions, thinly sliced, and sesame seeds for garnish — optional but delightful.
Prep and Cook Time
- Prep time: 15 minutes (quick and satisfying).
- Cook time: 25–30 minutes.
- Total time: ~40–45 minutes.
- Quick enough for a weeknight, elegant enough as a festive treat. Make-ahead tip: roast the cauliflower ahead and finish with the glaze just before serving.
Step-by-Step Instructions: Amazing Sticky Honey Garlic Cauliflower in 5 Steps
-
Preheat and Prepare
- Preheat your oven to 425°F (220°C). Line a baking sheet with parchment for easy cleanup. Toss cauliflower florets with 2 tablespoons olive oil, salt, pepper, and cornstarch until each piece is lightly dusted. You will feel the cornstarch cling like a soft powder as it promises a crisp exterior.
-
Roast to Golden Perfection
- Spread florets in a single layer on the baking sheet. Roast for 20–25 minutes, flipping halfway, until the cauliflower is tender through and golden on the edges. The hot oven will coax out a toasty aroma — that caramelized scent is your cue.
-
Make the Honey Garlic Glaze
- While the cauliflower roasts, melt butter in a medium skillet over medium heat. Add minced garlic and sauté for about 30 seconds until fragrant, not browned. Pour in honey, soy sauce, and vinegar, stirring to combine. Let the sauce simmer for 2–3 minutes until slightly thickened and glossy. You’ll see the honey catch the light and the pan fill with a sticky, sweet perfume.
-
Coat and Caramelize
- Add the roasted cauliflower to the skillet and toss gently to coat each floret in the glaze. Increase heat slightly for 1–2 minutes so the sauce reduces further and clings to the cauliflower, leaving a beautiful lacquer. The florets should look jewel-like and sticky.
-
Finish and Garnish
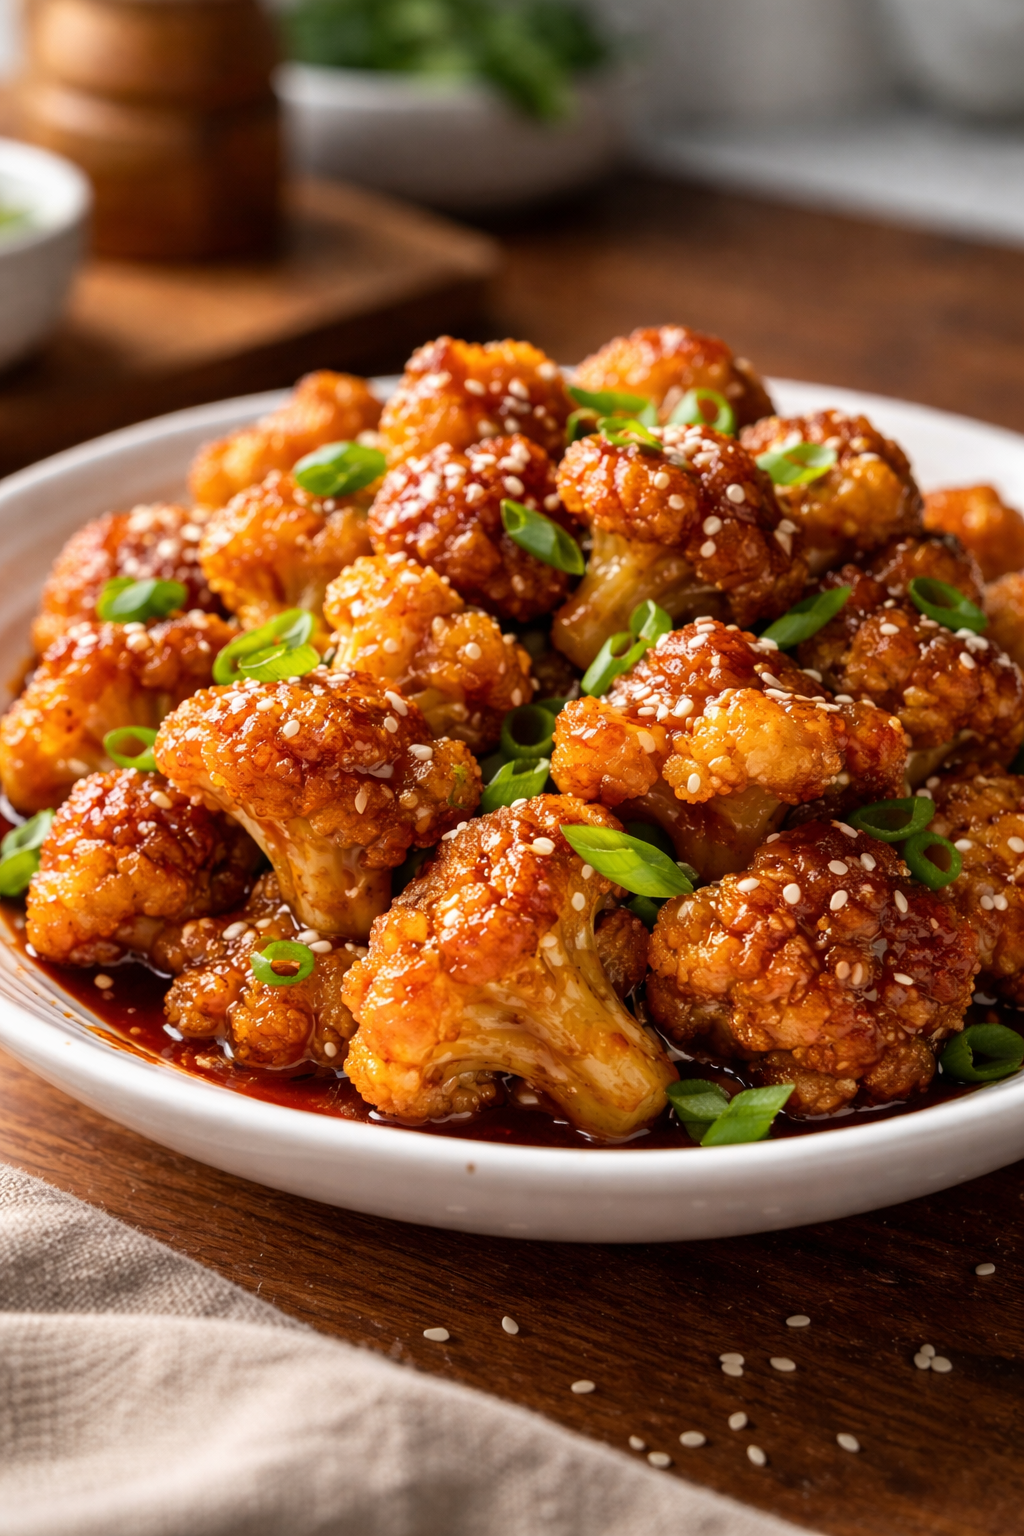
- Remove from heat, sprinkle with chili flakes if using, green onions, and sesame seeds. Serve immediately so the glaze remains glossy and the edges stay crisp. This last step is where the dish becomes visually irresistible — a warm, glossy bowl begging to be shared.
Variations and Twists
- Lighter option: Use avocado oil, reduce butter to 1 tablespoon, and substitute half the honey with a splash of low-sugar syrup.
- Air-fryer twist: Cook florets at 400°F (200°C) for 12–15 minutes, shaking once, then toss with glaze — a crisp finish and less oil.
- Protein boost: Add roasted chickpeas or pan-fried tofu to turn this into a hearty family recipe main.
- Spicy-sweet: Stir in Sriracha or gochujang for Korean-inspired heat and depth.
- Festive version: Add toasted walnuts, pomegranate seeds, and a squeeze of lemon for holiday sparkle.
Serving Suggestions
Serve Amazing Sticky Honey Garlic Cauliflower in 5 Steps on a big platter and watch the room melt a little. It’s gorgeous over steamed jasmine rice, nestled alongside quinoa for a healthy option, or spooned onto butter lettuce cups for a light, handheld treat. Pair with a crisp cucumber salad, sticky rice, or roasted sweet potatoes for a full plate that reads comfort food and celebration. This dish is perfect for casual dinners, potlucks, and as a finger-food centerpiece at festive gatherings.
Storage and Reheating
- Refrigerator: Store leftovers in an airtight container for up to 3 days. The glaze will settle; it’s still delicious.
- Freezing: Not ideal for long-term freezing because the texture changes, but you can freeze roasted florets before glazing for up to 2 months. Thaw and re-glaze when ready.
- Reheating: Reheat in a 375°F (190°C) oven for 8–10 minutes to revive crisp edges, or reheat briefly in a skillet over medium to re-melt the glaze. Avoid microwaving if you want to keep the crunch.
Kitchen Tips for Success
- Dry thoroughly: Pat cauliflower dry before cornstarch so the coating sticks and crisps properly.
- Don’t overcrowd the pan: Give florets space to brown; crowding causes steaming, not roasting.
- Watch the garlic: Garlic can burn quickly — sauté until fragrant, not browned, before adding liquids.
- Adjust sweetness: Taste the glaze and balance honey and vinegar to your palate — more vinegar brightens; more honey deepens the glaze.
- Serve immediately for best texture: The contrast between sticky glaze and crisp edge is at its peak right after cooking.
FAQs
Q: Can I make this gluten-free?
A: Yes — swap soy sauce for tamari and use rice flour or a certified gluten-free cornstarch.
Q: Is this dish suitable for meal prep?
A: You can roast cauliflower ahead and keep the glaze separate; combine and finish in a skillet when ready to eat for best texture.
Q: How many does this serve?
A: This recipe comfortably serves 3–4 as a side or 2–3 as a main with rice and vegetables.
Q: Can I use frozen cauliflower?
A: Fresh is best for crispness. If using frozen, roast on high heat directly from frozen and expect a softer texture.
Q: Can I make this vegan?
A: Absolutely — replace butter with vegan butter or extra oil and use maple syrup instead of honey.
Conclusion
There’s something quietly joyful about making Amazing Sticky Honey Garlic Cauliflower in 5 Steps: it’s approachable, fragrant, and generous — like a hug from the oven. Whether you’re stirring a quick dinner idea on a Wednesday night or plating a festive treat for guests, this recipe celebrates simple ingredients transformed by heat and a little patience. If you enjoy experimenting with sticky, garlicky flavors, you might like exploring other plant-forward ideas like a honey garlic air-fried tofu recipe for a protein-packed alternative; find a reliable guide at Honey Garlic Air Fryer Tofu – Eat With Clarity. Cook, share, and savor — and let this be the next family recipe you pass along.
Sticky Honey Garlic Cauliflower
Ingredients
Method
- Preheat your oven to 425°F (220°C). Line a baking sheet with parchment for easy cleanup.
- Toss cauliflower florets with 2 tablespoons olive oil, salt, pepper, and cornstarch until each piece is lightly dusted.
- Spread florets in a single layer on the baking sheet.
- Roast for 20–25 minutes, flipping halfway, until the cauliflower is tender through and golden on the edges.
- While the cauliflower roasts, melt butter in a medium skillet over medium heat.
- Add minced garlic and sauté for about 30 seconds until fragrant, not browned.
- Pour in honey, soy sauce, and vinegar, stirring to combine. Let the sauce simmer for 2–3 minutes until slightly thickened and glossy.
- Add the roasted cauliflower to the skillet and toss gently to coat each floret in the glaze.
- Increase heat slightly for 1–2 minutes so the sauce reduces further and clings to the cauliflower.
- Remove from heat, sprinkle with chili flakes if using, green onions, and sesame seeds.
- Serve immediately so the glaze remains glossy and the edges stay crisp.